2. Program mar345
- 2.1 Basic Concepts
- 2.2 Environment
- 2.3 Command Line Options
- 2.4 User Interface
2.1 Basic Concepts
The program has to perform several tasks:
- Allow user input, i.e. setup data collection parameters, analyze images, etc.
- Send commands to the detector (mar345 Image Plate)
- Receive status information from the detector
- Transform spiral images into Cartesian images
- Display images
- Send commands to the goniostat (optional)
- Receive status information from the gonistat
The mar345-detector is driven by an autonomous mini-computer which communicates with the host computer through an Ethernet interface. It features a real-time operating system which provides the well known IP services (ftp, telnet, ping, Unix sockets). It comes with a fixed IP-address of 192.0.2.1 for the mar345-detector and requires the network card of the host computer to be set to address 192.0.2.2. Program mar345 talks to the scanner using standard Unix sockets on ports 4441, 4442, 4443 and 4444. Please verify, that a computer can successfully "ping" to IP-address 192.0.2.1 (i.e. the mar345 detector), otherwise program mar345 cannot control the detector. When connecting the detector directly to the host computer, a "cross-over" network cable with RJ45-connectors is MANDATORY. When using standard network cables (i.e. with 1:1 wiring), a hub or network switch must be placed inbetween the computer and the detector.
Transformation and data display requires memory as well as CPU-time. Typically, the program mar345 keeps the equivalent of 2.5 images in memory. When using images with 3450*3450 pixels, this corresponds to 75 MB. A minimum of 128 MB is therefore recommended for a host computer driving the detector, but 256 MB are actually more appropriate.
Data collection should always have highest priority. However, there is little protection against abuse of the host computer's resources by other processes. In particular, memory consuming data processing jobs can cause drops in performance of the workstation to such a degree that nothing else will work. I/O-operations can be even more critical. This affects network I/O, in particular.
Note: it is not advisable to write data out to an NFS-mounted disk since any problem on the network will affect data collection .
2.2 Environment
The program relies on a couple of predefined environment variables. The environment should best be defined within the shell startup scripts, i.e. files $HOME/.cshrc (C-shell) or $HOME/.tcshrc (TC-shell) or $HOME/.bashrc (Bourne-shell) using the corresponding syntax. The mar345dtb software distribution guide gives more details about how the mar software is organized. The official mar345 software distributions assumes that the default user's shell is (t)csh. Please note, that Linux's and Mac's default shell are bash! The following environment variables need to be declared:
Table 1: Environment variables
| Variable | Default value | Description |
|---|---|---|
| MARHOME | $HOME | Root directory for mar software distribution |
| MARTABLEDIR | $MARHOME/tables | Location of calibration and configuration files |
| MAR_SCANNER_NO | 000 | Three digits serial number for mar345 scanner |
| MARLOGDIR | $MARHOME/log | Location of all log-output files and of data input files. The program mar345 expects to find subdirectories beam, log, lp, spy and sets. Very important: this directory must have write permission for the mar345 user! |
| MARMANDIR or MARDOCDIR or MARHELPDIR | $MARHOME/man/ | Location of this documentation files. This should be the parent tree with subdirectories 1, pdf, html, help and mar345. |
| MARSTATUSFILE | $MARHOME/log/mar345.status | Periodically written output file containing hardware status bits. See section Output for further details. |
| MARMESSAGEFILE | $MARHOME/log/mar.message | Periodically written output file containing software messages. See section Output for further details. |
| MARMUSKEY | Only for IuS users: system specific password Input for further details. |
The choice on how to set the environment variables depends on local
usage and personal preference. In particular, you will have to decide wether
you want to install the software in a location with general read access and
no write access. Thus, the software may be installed e.g. in
/usr/local/mar
with subdirectories
tables, doc, man, bin
and
log.
It is essential that the user has permission to write into $MARLOGDIR
and the following directories thereof:
- $MARLOGDIR/log
- $MARLOGDIR/lp
- $MARLOGDIR/spy
- $MARLOGDIR/sets
2.3 Command Line Options
mar345 can be invoked in a terminal window plainly by typing "mar345". The program however understands the command line options given in Table 2. Do not run the program in the background and do not use this terminal window for other purposes. The program will send important output to the standard output and you don't want to miss it, although almost all output can also be found in the log file.
At startup, the program will tell you something like:
mar345: Version 5.4 (May 30 2011) by marxperts ...
mar345: Connected to host '192.0.2.1' on port 4441 (COMM)
mar345: Connected to host '192.0.2.1' on port 4442 (STAT)
mar345: Connected to host '192.0.2.1' on port 4443 (DATA)
mar345: Connected to host '192.0.2.1' on port 4441

=======================================================================
            Program     :  mar345
            Version     :  5.4  (May 30 2011)
            Scanner no. :  027
            Scanner mode:  345 mm @ 0.15 mm
            Started on  :  Thu Dec 22 10:35:01 2011
            LOG  file is:  /home/cla/log/log/mar.log.88
            STAT file is:  /home/cla/log/lp/mar.lp.88
=======================================================================
The program will also tell you if it is able to talk to the detector. If environment variables are not set you will be notified.
At startup, the program writes information about connection success or failure into file $MARLOGDIR/mar.message. This message is read and displayed by program marstart which is called automatically by program mar345. If the program cannot connect to the detector, the program mar345 will be halted. Program marstart then offers a choice of either killing process mar345 or continuing with program mar345 without network connection.
Note that it takes approx. 1 minute after turning on the mar345-detector before program mar345 can talk to them, even if the ping service is available within a couple of seconds time.
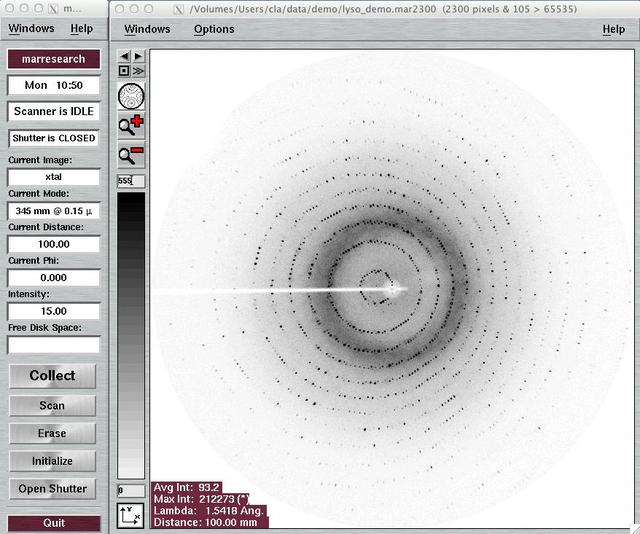
After the initializations, the program presents essentially two windows:
an image display area and the mar345 main window with status
information and further input buttons.
Table 2: Command line options for mar345
| Name | Alternative | Arguments | Example | Description |
|---|---|---|---|---|
| -host | <string> | -host 192.0.2.1 | Host name to use for the mar345 detector. | |
| -p | --port | <number> | -p 4441 | Socket port to use for the mar345 detector |
| -c | -colors | <number> | -c 32 | No. of colors to use for image display. |
| --default | <number> | --def 2300 | Default scan mode to use (one of 3450,3000,2400,2300,2000,1800,1600 or 1200). | |
| -d | -debug | <number> | -debug 16 | Debugging flag (undocumented). |
| -h | -help | Print usage summary | ||
| -hw | Run program without connecting to the mar345 detector | |||
| -k | -keep | Keep raw spiral images on output of transformed image | ||
| -m | -more | <number> | -more 3 | Explicite erbosity level |
| -metal | -source | <host> <number> | -metal mar112 45678 | Connect to metaljet controller |
| -nofull | Use smaller image display size | |||
| -noinit | Skip initialization (selftest) of detector | |||
| -noxf | Do not transform raw spiral images to Cartesian coordinates | |||
| -setd | Allow to redefine DISTANCE from GUI | |||
| -s | --server | <number> | -s 8888 | TCP/IP-server port to listen for commands to drive the program mar345. |
| -v | -verbose | Increase printed output. No arguments. | ||
2.4 User Interface
The user interface features 2 major windows:
- Main Window with a summary of current activities
- Image Window to visually inspect collected images
2.4.1 "Main" Window
The main window controls all detector and goniostat functions. If the first place it consists of two areas:
- menu bar
- a status display area with several text fields and push buttons
2.4.1.1 Menu Bar
The menu bar allows for opening additional windows. Most of them
can be opened either by selecting the corresponding choice with the
mouse button or by pressing the corresponding short-cut key.
Some of the windows can also be opened by pressing the status buttons
or control buttons (see below).
2.4.1.1.1 Windows Menu
The Window menu pops up if the "Windows" button in the menu bar is pressed or if "Alt+w" is pressed while the pointer is in the main window. Most of the choices in the menu will allow to navigate from page to page in order to access specific functions:
| Menu | Menu Choice | Shortcut | Description |
|---|---|---|---|
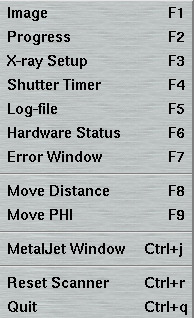
| Image | F1 | Pops up the image display window |
| Progress | F3 | Pops up the progress window | |
| X-ray Setup | F3 | Pops up the X-ray Setup window | |
| Shutter Timer | F4 | Pops up the Shutter Timer window | |
| Log-file | F5 | Pops up the log file window | |
| Hardware Status | F6 | Pops up the Hardware Status window | |
| Error Window | F7 | Pops up the Error window | |
| Move Distance | F8 | Pops up the Move Distance window | |
| Move PHI | F9 | Pops up the Move PHI window | |
| MetalJet Window IuS Window | Ctrl+j Ctrl+i | Pops up the MetalJet window Pops up the IuS window | |
| Reset Scanner | Ctrl+r | Sends a reboot instruction to the mar345 scanner. | |
| Quit | Ctrl+q | Leave program mar345 |
2.4.1.1.2 Help Menu
The Help menu pops up if the "Help" button in the menu bar is pressed or if "Alt+h" is pressed while the pointer is in the main window.
| Menu | Menu Choice | Description |
|---|---|---|

| Documentation (html) | Calls the WWW-browser and loads file $MARMANDIR/mar345/index.html |
| Online help | Pops up a window with the possibility to get some basic online as read from file $MARMANDIR/help/mar345.hlp. | |
| About | Shows current program version |
2.4.1.2 Status
The status area provides information about the current detector activities at all times, i.e. current motor positions, the shutter state, X-ray intensity readings, etc. It features text fields and push buttons which will dynaically change. Most of the status buttons have double functionality: they display current status (e.g. motor positions) and they can be pushed to pop up additional windows:
| Button | Action when pressed | Description | |
|---|---|---|---|

| marxperts | none | Shows ending time during data collection |
| Mon 15:30 | none | Current computer time | |
| Scanner is IDLE | none | Current dtb or detector action (progress bar) | |
| Shutter CLOSED | none | Shows current state of experimental beam shutter. | |
| Image Name | none | Displays current image name during data collection | |
| Scanmode | none | Displays current scan mode of mar345-detector | |
| Distance | Pops up the "Move Distance"-window | Displays current distance detector to crystal | |
| Phi | Pops up the "Move Phi"-window | Displays current PHI position | |
| Intensity | none | Displays current reading of selected ionization chamber | |
| Free Disk Space | none | Displays remaining disk space in current data directory | |
| Collect | Replaces the buttons "Scan, Erase, Initialize, Open Shutter" with a choice of different data collection options (see below) | ||
| Scan | Pops up the "Scan"-window | ||
| Erase | Immediately starts to erase the imaging plate in the currently selected scanmode. | ||
| Initialize | Pops up the "Initialize"-window | ||
| Open Shutter | Opens (or closes the local X-ray beam shutter |
The data collection menu and the way to set up different types of data collections is described in the separate chapter "Collect".
2.4.2 Image
The "Image"-window can be accessed by selecting the corresponding choice in the "Windows"-menu or by pressing the "F1"-key while the pointer is in the main window. This window is the area where to visually inspect images. The separate chapter "Image" describes the functionality of this window.
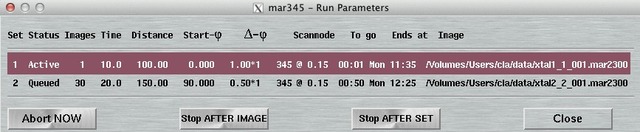
2.4.3 Progress
The "Progress"-window can be accessed by selecting the corresponding choice in the "File"-menu or by pressing the "F2"-key while the pointer is in the main window.
Here, you see the most important parameters of ongoing or programmed data collection runs.
The data set that is currently active is marked in "mar" red and white fonts, the queued ones are shown with a lighter background. The ones that are already finished are drawn with a grey background. In this window you will also find the time the data collection needs to complete and the actual ending time.
Table 6a: The columns in the 'Params' section of "Progress"-window
| Name | Description |
|---|---|
| Set | Data set as programmed in the "Change Parameters" window. |
| Status | Either "Active", "Queued" or "Done" |
| Images | No. of remaining images out of total no. of images in this set |
| Time | Exposure time in seconds. When working in DOSE mode, the time will be only approximated. |
| Distance | The distance detector-to-sample in mm. |
| Phi | The Phi at start of the current image in deg. |
| Delta-Phi | The no. of oscillations * Delta-Phi in deg. |
| Format & Scanmode | The shown string is the actual image name extension and corresponds to the choices for "Format" and "Scanmode" in the "Change Parameters"-window. |
| To go | Time in hrs to terminate this set. |
| Ending at | Time when this data set completes. |
| Image | Full path name of current image (or first image in set). |
Table 6b: The buttons in the "Progress"-window
| Name | Description |
|---|---|
| Abort NOW | Immediately abort the exposure or any motor movement. |
| Stop after IMAGE | Stop data collection of all data sets after finishing exposure and
readout of current image. |
| Stop after SET | Stop data collection of all queued data sets after finishing the
current set. |
| Close | Closes this window. Get this window back with the "F2"-key. |
2.4.4 X-ray Setup
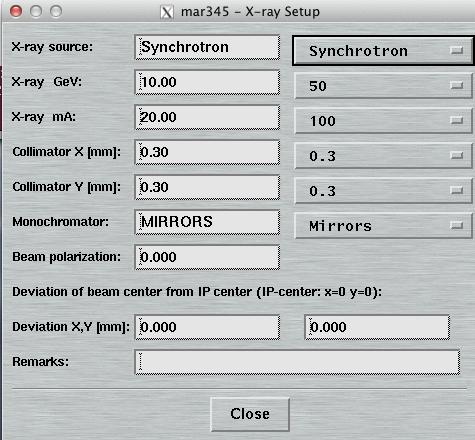
The "X-ray Setup"-window can be accessed by selecting the corresponding choice in the "Windows"-menu of the main window.
Here, you can provide some information that is going to end up in the headers of images created by the mar345-detector. This information is strictly optional and there are no programs that are systematically making use of it. It would be good practice, though, to fill in the fields. A general experience is, that when working with images later you will have trouble to find notes written in a logbook, but it is straightforward to just look into the image header (e.g. with program catmar).
2.4.5 Shutter Timer
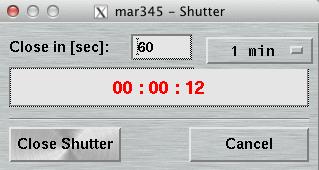
The "Shutter Timer"-window can be accessed by selecting the corresponding choice in the "Windows"-menu or by pressing the "F4"-key while the pointer is in the main window, or by selecting the corresponding tab in the main window.
Here, you may manually open the experimental beam shutter of the dtb without having to setup an exposure. It should be noted that for normal users there is little need to do so. When opening the shutter, there will be a clock showing the time elapsed since opening the shutter. The shutter will automatically closed after the time given in the "Close in [sec]" text field has elapsed .
2.4.6 Log
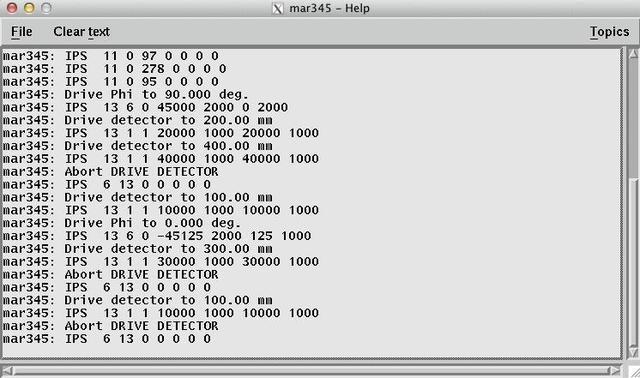
The "Log"-window can be accessed by selecting the corresponding choice in the "Windows"-menu or by pressing the "F5"-key while the pointer is in the main window, or by selecting the corresponding tab in the main window. All hardware errors and warning as well as some additional information may be written inside the text area of this window.
In case of hardware problems, first have a look inside this window to get some history of the problem.
2.4.7 Hardware Status
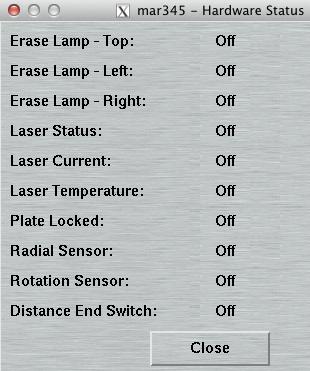
The "Hardware"-window can be accessed by selecting the corresponding choice in the "Windows"-menu or by pressing the "F6"-key while the pointer is in the main window.
Here, you can look at certain hardware bits in detail. The information presented here reflects the contents of the status block that is periodically sent by the mar345-controller to the computer. The entries should be self-explanatory. Watch the bits as they change state during a scan...
2.4.8 Error window
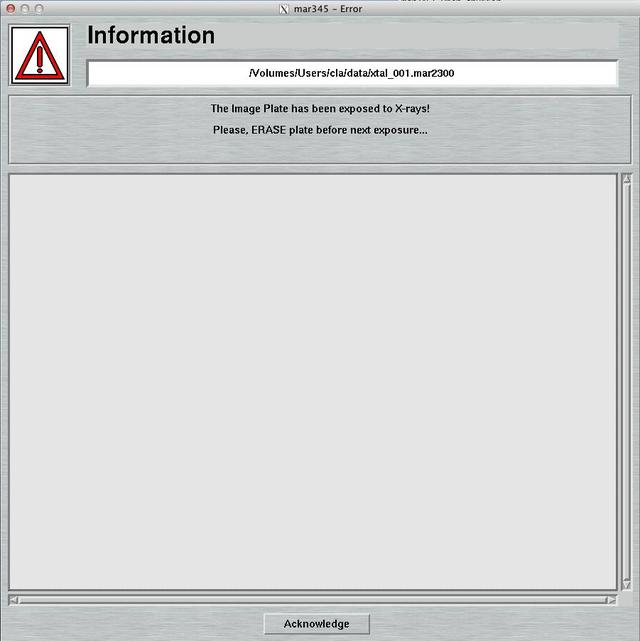
The "Error"-window can be accessed by selecting the corresponding choice in the "Windows"-menu or by pressing the "F7"-key while the pointer is in the main window.
Here is where you will find important error messages and warnings.
2.4.9 Move Distance
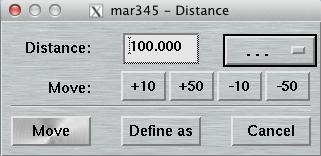
The "Move Distance"-window can be accessed by selecting the corresponding choice in the "Windows"-menu or by pressing the "F8"-key while the pointer is in the main window or by pressing any of the distance status button in the status area. The window does not show up, if the mar345 program is configured to work without base (IGNORE BASE).
Within this window, you can move the motor for the detector distance translation in the standard mar goniostat. You may also redefine the currently know position of the motor but only if the program "mar345" has been started with the command line argument "-setd". This is a protection for not accidentally overwrite an well determined parameter. Please note, that the scanner controller always keeps the currently known values. Unless the detector is physically removed from the translation page, there should be no need to redefine this value. In case of doubt, it is suggested to "initialize" the distance translation stage with a premeasured value taken from the scanner configuration file.
2.4.10 Move Phi
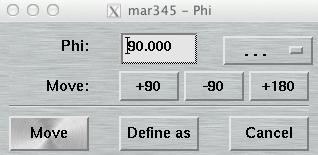
The "Move Phi"-window can be accessed by selecting the corresponding choice in the "Windows"-menu or by pressing the "F9"-key while the pointer is in the main window or by pressing any of the PHI status button in the status area. The window does not show up, if the mar345 program is configured to work without base (IGNORE BASE).
Within this window, you can move the motor for the PHI axis in the standard mar goniostat. You may also redefine the currently know position of the motor.
2.4.11 Initialize
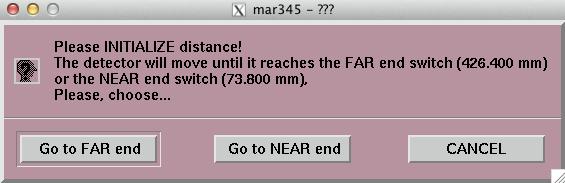
The "Initialize"-window can be accessed by selecting the corresponding button in the main window. Here, you initialize the motor for the distance translation stage of the standard mar goniostat (see also chapter "Move Distance"). You may initialize the motor either at the far end (away from the sample) or at the near end (close to the sample). It should be noted that it is definitely safer to initialize the motor at the far end of the translation stage in order to avoid collisions with the goniometer head and/or or cryo-head.
Also, when pushing the Initialize-button the program reloads the configuration file $MARTABLEDIR/config.$MAR_SCANNER_NO. If you want to do some changes to the configuration file and try the parameters on-the-fly, this is the way to do it. Please note, that parameters that affect the graphical layout of the program usually require a restart of the program. For details about the configuration file, see chapter Configuration File in section Input.
2.4.12 Scan
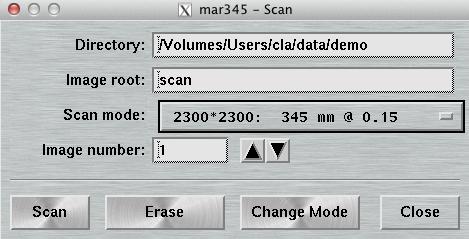
The "Scan"-window can be accessed by selecting the corresponding button in the "Status"-area of the main window. Here, you may select a directory, image name, image number and scanmode and choose an action. You may:
- Scan the plate, i.e. make a single read-out and store data to disk
- Erase the plate, i.e. make a scan without actually storing the data
- Change mode, i.e. drive the scanning head inside the detector to the choosen scanmode and load the corresponding speed profiles.
This feature is not used very often unless for very special experiments. This is why this window is accessible only via one button. For producing an output file, there is no choice of format. Images will always be produced in the mar345-format that is described elsewhere. The output file name follows the same rule as described in the chapter about data collection.
With keyword "USE REFERENCE" in the configuration file, an additional field for "Reference image" is available starting with version 6.6 of the program. Here, you can enter the full name of a reference image. Please refer to the chapter 4.2.1 Directory, Image Root and Reference Image for further details.
2.4.13 MetalJet
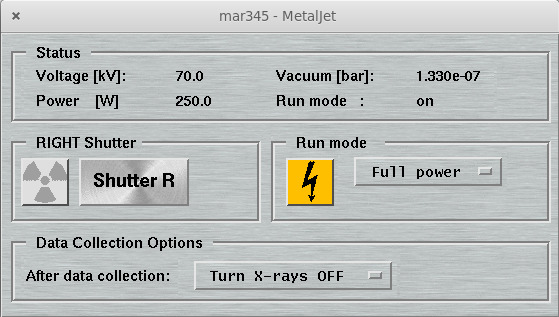
The "MetalJet"-window can be accessed by selecting the corresponding choice in the "Windows"-menu or by pressing the "Ctrl+j"-key while the pointer is in the main window. The window only becomes visible, if the mar345 program is configured to work without the MetalJet controller box manufactured by Marxperts. The configuration file needs to have an entry starting with METALJET and also the line SHUTTER JET1 or SHUTTER JET2. If the SHUTTER line is missing, the program will send shutter and exposure commands to the locally supported shutter of the standard base. See 5.2.1 Input -> Configuration File -> Keywords for further details.
Within this window, you can operate the hardware shutter of the MetalJet generator and ramp the generator power up and down, if configured correctly. When the program is configured to use the shutter of the MetalJet generator instead of the local shutter, the program will be able to make a data collection using timed exposures with the MetalJet shutter. When using the MetalJet shutter, it is also mandatory to use IGNORE BASE. In this mode, the mar345 program will drive neither DISTANCE nor PHI, i.e. the values entered in the data collection section will be ignored.
2.4.14 IuS
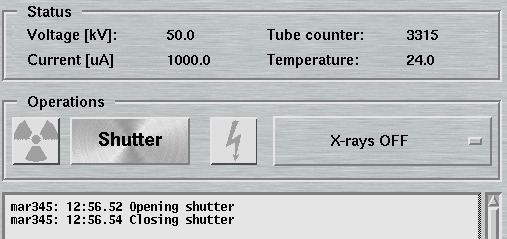
The "IuS"-window can be accessed by selecting the corresponding choice in the "Windows"-menu or by pressing the "Ctrl+i"-key while the pointer is in the main window. The window only becomes visible, if the mar345 program is configured to work without the IuS controller manufactured by Incoatec. The configuration file needs to have an entry starting with IUS and optionally the line SHUTTER IUS. If the SHUTTER line is missing, the program will send shutter and exposure commands to the locally supported shutter of the standard base. See 5.2.1 Input -> Configuration File -> Keywords for further details.
Within this window, you can operate the hardware shutter of the IuS generator and ramp
the generator power up and down, if configured correctly. When the program is configured
to use the shutter of the IuS generator instead of the local shutter, the program
will be able to make a data collection using timed exposures with the IuS shutter.