Easymount - Easy Sample Changer
1. Introduction
 The "easymount" is an extension of the
desktop beamline. Its purpose is to safely mount and unmount samples
on the goniometer head under cryogenic conditions. The "easymount" provides
a fully motorized goniometer head with xyz-translations as well as motorized cryo-actuator.
For automatic sample mount and unmount operations, the "easymount" features 2 more motors:
the so called ROTOR and SERVER.
The "easymount" is an extension of the
desktop beamline. Its purpose is to safely mount and unmount samples
on the goniometer head under cryogenic conditions. The "easymount" provides
a fully motorized goniometer head with xyz-translations as well as motorized cryo-actuator.
For automatic sample mount and unmount operations, the "easymount" features 2 more motors:
the so called ROTOR and SERVER.
The "easymount" is designed
to work with standard cryogenic vials commonly used in X-ray crystallography.
Those vials are glued into special nylon containers, that are safer to
handle than the standard vials themselves. The benefit of enclosing the vials in
nylon containers is also that the time it takes for the liquid nitrogen in
the vials to boil off is greatly increased to about 60 seconds.
The "Easy"-page can be accessed by selecting the corresponding tab in the main window or by pressing the "Ctrl+9"-key while the pointer is in the main window. The page is available only if the configuration file carries the line CSC EASY (see chapter Configuration File in section Input). Here, you can access all functions of the optional easymount sample changer.
The "Easy"-page features 2 work areas:
- an area for performing operations on the easymount (see chapter 2)
- an area for initializing the easymount (see chapter 3)
2. Operation
The easymount is typically operated from the remote control unit (RC) supplied with the easymount hardware. That RC features 3 buttons that are exclusively used by the easymount:
- INIT - Automatically initializes all relevant easymount motors but also
the xyz-motors of the goniometer head.
WARNING: if a frozen sample is mounted this action is going to move the sample out of the cold stream and your sample will be lost! - MAGNET - Operates the solenoid that holds the magnetic cap on the goniometer head. If the solenoid is active, a red LED is lit on the RC unit.
- UNLOAD - This button triggers the sequence of unloading and loading of a sample. This sequence consists of 3 steps as shown below.
The corresponding operations can also be carried out from the GUI by pushing the corresponding buttons (see below). However, since there is a requirement for manually handling the cryo-vials this is NOT the common thing to do!
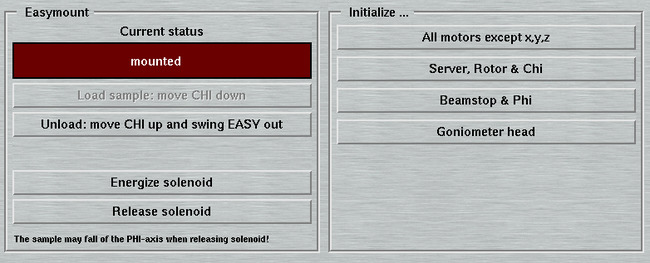
Note: when the "easymount" motors are in their default positions (i.e. CHI down), the status of the "easymount" always is "mounted", regardless of the physical presence of a sample on the goniometer head. This might be confusing to novel users, but the "easymount" does not have sensors for detecting the physical presence of a vial in the SERVER bracket and a cap on the goniometer head. Therefore, the individual steps for the "easymount" operations do not depend on the physical presence of a vial and a cap and do work the same with or without them.
Let us assume that a sample is mounted on the goniometer head and motors CHI, ROTOR and SERVER are in their default positions. In the "Easy"-page of the GUI, the Easymount section will look like shown on the picture. If you wish to take if off the goniometer head using the easymount functions, do the following:
| ACTION | DESCRIPTION |
|---|---|
| Push UNLOAD |
 In the "Easy"-page
of the GUI, the equivalent action is to press the button "Unload: move CHI up...".
In the "Easy"-page
of the GUI, the equivalent action is to press the button "Unload: move CHI up...".
The CHI axis moves up to approx. 60 deg., the ROTOR swings out and the SERVER reaches out. The sample is still mounted on the goniometer head in the cold-stream. You are now expected to manually place a cryo-vial WITHOUT cap but filled with LN2 into the SERVER bracket. |
| Push UNLOAD |
 In the "Easy"-page
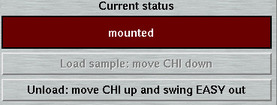
of the GUI, the equivalent action is to press the button "Unload: swing EASY in ...".
In the "Easy"-page
of the GUI, the equivalent action is to press the button "Unload: swing EASY in ...".
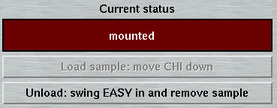
The SERVER drives back and the ROTOR swings back towards the goniometer head. The vial approaches the sample while the ACTUATOR motor moves the cryo-head out of the way by a couple of millimeters. The vial filled with LN2 is placed over the sample, the CHI is slightly tilted in order to release the cap from the solenoid which is turned off at the same time. The cap with the sample now sits safely on the vial and is submerged in the remaining LN2. The ROTOR swings out again and the SERVER presents the vial. You are now expected to manually retrieve the vial from the SERVER and put it in a safe LN2 storage dewar. The status of the "easymount" is "empty" (see below). |
| Push UNLOAD |
 In the "Easy"-page
of the GUI, the equivalent action is to press the button "Load sample: move CHI down".
In the "Easy"-page
of the GUI, the equivalent action is to press the button "Load sample: move CHI down".
In order to return to normal data collection conditions, you will have to push the UNLOAD button again. Before doing so, you may put a put a new vial into the bracket of the SERVER. As far as the "easymount" is concerned, it is absolutely okay, to leave the bracket empty and just push the button. The previous step will be repeated in reverse order. I.e. the easymount motors will place the sample on the goniometer head. After this has been accomplished, the ROTOR, SERVER and CHI drive to their default positions. The emtpy vial remains in the bracket of the SERVER. The final status of the "easymount": "mounted". Note: it does not matter whether a cap is actually mounted on the goniometer head or not! |
Besides loading and unloading samples it is possible to individually operate the solenoid that holds a magnetic cap on the goniometer head. Please note, that it is a CRUCIAL requirement that the cap is out of magnetic steel. Aluminum caps are not going to work and neither will caps with an ink-printed barcode because the ink works as insulation layer that greatly reduces the holding force of the solenoid! The solenoid can be operated using the "MAGNET" button on the RC unit where a red LED light marks the solenoid being energized. The solenoid can also be operated from the buttons in the GUI shown above, i.e.
- Release magnet
- Energize magnet
3. Initialize
The easymount relies on the error-free sequence of a number of individual tasks. In real life, errors do occur due to various reasons. In most cases it will be necessary to reinitialize the easymount to recover from a hardware error. The initialization will bring all components back into a known state. The initialization routines work without variable parameters which make them straightforward to use. The initialization is divided into groups of motors which have to be initialized together, since motions or positions of some motors may depend on the ones from other motors:
- All motors except xyz
- SERVER, ROTOR and CHI
- BEAMSTOP and PHI
- Goniometer head (xyz)
Usually, an initialization of all components is the simplest thing to do but there is a choice of only initializing one particular group.